Episode 2
Links
Introduction
In this episode we will create a simple block and a more complex block with associated block entity. We will learn the following things in this tutorial:
- Creation of a custom block and block entity
- Block entity renderer for fancy effect
- Simple usage of a particle system
- Capability for storing items
- Datagen for all the jsons
- Tags for blocks and items
We will also clean up the gradle and mod setup stuff a bit.
The main mod class
In this tutorial we greatly simplified the main mod class. Most of the things we did here are now done in other classes. We removed the client specific setup. This is now in a different file. We moved all registration stuff to the Registration class. Finally we removed all things we don't need right now.
@Mod(Tutorial2Block.MODID)
public class Tutorial2Block {

    public static final String MODID = "tut2block";
    public static final Logger LOGGER = LogUtils.getLogger();

    public Tutorial2Block(IModBus modEventBus) {
        Registration.init(modEventBus);

        modEventBus.addListener(this::commonSetup);
        modEventBus.addListener(Registration::addCreative);
        modEventBus.addListener(DataGeneration::generate);
    }

    private void commonSetup(final FMLCommonSetupEvent event) {
    }
}
Registration
Everything related to registration has moved to the Registration class. We define three
deferred registers here: one for blocks, one for items and one for block entities. We then
go on to define a simple block with associated item and a complex block with associated
item and block entity. The init method is called from the main mod class to register
the deferred registers.
Finally, the addCreative method is added to the mod event bus to add the blocks to the
creative tabs.
public class Registration {

    public static final DeferredRegister.Blocks BLOCKS = DeferredRegister.createBlocks(Tutorial2Block.MODID);
    public static final DeferredRegister.Items ITEMS = DeferredRegister.createItems(Tutorial2Block.MODID);
    public static final DeferredRegister<BlockEntityType<?>> BLOCK_ENTITIES = DeferredRegister.create(BuiltInRegistries.BLOCK_ENTITY_TYPE, Tutorial2Block.MODID);

    public static final DeferredBlock<SimpleBlock> SIMPLE_BLOCK = BLOCKS.register("simple_block", SimpleBlock::new);
    public static final DeferredItem<Item> SIMPLE_BLOCK_ITEM = ITEMS.register("simple_block", () -> new BlockItem(SIMPLE_BLOCK.get(), new Item.Properties()));

    public static final DeferredBlock<ComplexBlock> COMPLEX_BLOCK = BLOCKS.register("complex_block", ComplexBlock::new);
    public static final DeferredItem<Item> COMPLEX_BLOCK_ITEM = ITEMS.register("complex_block", () -> new BlockItem(COMPLEX_BLOCK.get(), new Item.Properties()));
    public static final Supplier<BlockEntityType<ComplexBlockEntity>> COMPLEX_BLOCK_ENTITY = BLOCK_ENTITIES.register("complex_block",
            () -> BlockEntityType.Builder.of(ComplexBlockEntity::new, COMPLEX_BLOCK.get()).build(null));

    public static void init(IEventBus modEventBus) {
        BLOCKS.register(modEventBus);
        ITEMS.register(modEventBus);
        BLOCK_ENTITIES.register(modEventBus);
    }

    static void addCreative(BuildCreativeModeTabContentsEvent event) {
        if (event.getTabKey() == CreativeModeTabs.BUILDING_BLOCKS) {
            event.accept(SIMPLE_BLOCK_ITEM);
            event.accept(COMPLEX_BLOCK_ITEM);
        }
    }
}
Simple block
Let's first discuss the simple block. This is a block that doesn't have a block entity but it does have some special features. Let's look at the code first. In the constructor we define a block with a strength of 3.5 (that influences how long it takes for a pickaxe to actually break the block), we require the correct tool for drops and we enable random ticks.
The tool that is required to harvest this is defined with tags. More on that later in this tutorial.
Because we specified random ticks we need to override the randomTick method. This method is
called every random tick. In this case we send some smoke particles at the top of the block.
Finally, we override the use method. This method is called when the player right clicks on
the block. In this case we check if we are on the client side. If so we explode the block
and return InteractionResult.SUCCESS to indicate that we handled the interaction. If we
are on the server side we return InteractionResult.PASS to indicate that we didn't handle
the interaction.
public class SimpleBlock extends Block {

    public SimpleBlock() {
        // Let our block behave like a metal block
        super(Properties.of()
                .strength(3.5F)
                .requiresCorrectToolForDrops()
                .sound(SoundType.METAL)
                .randomTicks());
    }

    @Override
    public void randomTick(BlockState state, ServerLevel level, BlockPos pos, RandomSource random) {
        level.sendParticles(ParticleTypes.SMOKE, pos.getX() + .5, pos.getY() + 1.5, pos.getZ() + .5, 10, 0, 0, 0, 0.15);
    }

    @Override
    public InteractionResult use(BlockState state, Level level, BlockPos pos, Player player, InteractionHand hand, BlockHitResult result) {
        if (level.isClientSide) {
            level.explode(null, pos.getX() + .5, pos.getY() + .5, pos.getZ() + .5, 2f, false, Level.ExplosionInteraction.MOB);
            return InteractionResult.SUCCESS;
        }
        return InteractionResult.PASS;
    }
}
That's all there is to it. Later when we talk about data generation we will show how we define the model, the loot table, a recipe and the tags for this block.
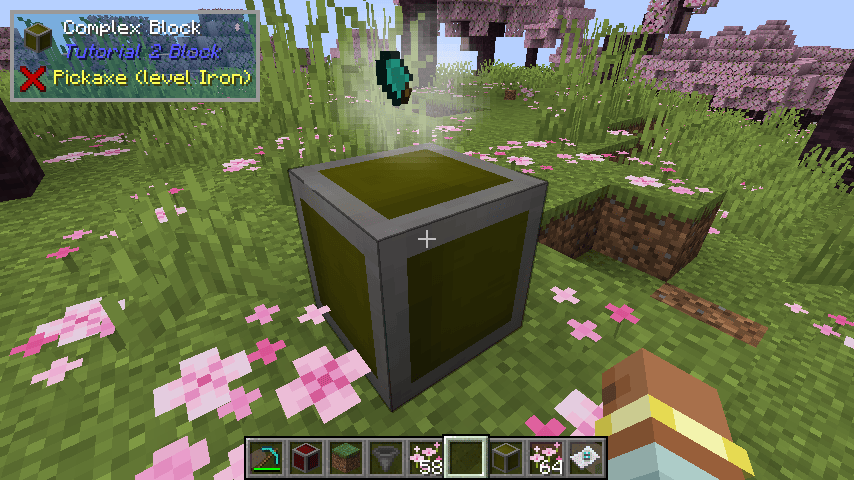
Complex block
The complex block is a block that has a block entity. The block entity is used to store one item and also to render a fancy effect. Let's first look at the block class.
Remember our previous tutorial. There we talked about definitions and how there is only one of each type of Block in the game. That's why you cannot store any data in the block class because it is shared between all instances of the block. That's why we need a block entity. The block entity is created for each instance of the block in the world. This means that we can store data in the block entity and it will be unique for each instance. In addition block entities also allow us to perform certain actions every tick. With a block you can only do scheduled or random ticks.
The block class
The constructor is similar to the simple block.
Because we have an associated block entity with our block we need to implement the EntityBlock
interface. This interface has two methods that we need to implement. The first method is
newBlockEntity. This method is called when the block is placed in the world. It is used to
create the block entity. The second method is getTicker. This method is called when the block
entity is created. It is used to create a BlockEntityTicker that can be used to perform
certain actions every tick. In this case we return null for the client side because we don't
need a ticker there. On the server side we return a ticker that will delegate to the block
entity. By doing it like this we know that our block will only tick on the server side.
Ticks occur 20 times per second (under normal load) and they happen both client and server side.
public class ComplexBlock extends Block implements EntityBlock {

    public ComplexBlock() {
        // Let our block behave like a metal block
        super(BlockBehaviour.Properties.of()
                .strength(3.5F)
                .requiresCorrectToolForDrops()
                .sound(SoundType.METAL));
    }

    // Our block has an associated block entity. This method from EntityBlock is used to create that block entity
    @Nullable
    @Override
    public BlockEntity newBlockEntity(BlockPos pos, BlockState state) {
        return new ComplexBlockEntity(pos, state);
    }

    // This method is used to create a BlockEntityTicker for our block entity. This ticker can be used to perform certain actions every tick
    @Nullable
    @Override
    public <T extends BlockEntity> BlockEntityTicker<T> getTicker(Level level, BlockState state, BlockEntityType<T> type) {
        if (level.isClientSide) {
            // We don't have anything to do on the client side
            return null;
        } else {
            // Server side we delegate ticking to our block entity
            return (lvl, pos, st, blockEntity) -> {
                if (blockEntity instanceof ComplexBlockEntity be) {
                    be.tickServer();
                }
            };
        }
    }
}
The Block Entity class
The block entity class is where the magic happens. We are going to go over this code in parts. First start with a few constants. We define a tag name for the items that we store in the block entity (more on that later). We also define the number of slots that we have and the index of the slot that we use. This block will have an inventory of only one slot.
Capabilities
To represent our items we use a capability. Capabilities are a way to attach additional behaviour to an object. In this case we attach an inventory to our block entity. Capabilities can also be attached to other objects like entities, itemstacks, chunks, etc. By using capabilities we can ensure that our block will work correctly with other mods that also use capabilities.
The capability that we use in this block is the IItemHandler capability. This capability is
used to represent an inventory. We use the Lazy class to create a lazy reference to
the capability. By using this you can delay the actual creation of the capability instance
until it is actually needed. This is useful because the capability might not be needed at all.
In this tutorial we are guaranteed to always need the items so that's why we do a direct
declaration of the item stack handler (items variable). This variable allows us to access
the items in a more optimal and convenient way.
Note that NeoForge also provides energy and fluid capabilities. In addition, mods can also define their own capabilities if needed.
For our item handler we use the standard NeoForge item stack handler (ItemStackHandler).
This class is a convenient way to store a list of items. It also has methods to serialize
and deserialize the items (we will use that later). We override the onContentsChanged method to mark the block entity as
changed when the contents of the item handler change. This is needed so that the block entity
will be saved to disk.
Because we also need to tell the client that the block entity has changed we also send a block update to the client. Later on the client we will listen for this and update the block entity.
Our capability has to be registered. For this we add the following to the main mod class:
public Tutorial2Block(IModBus modEventBus) {
    ...
    modEventBus.addListener(this::registerCapabilities);
}

private void registerCapabilities(RegisterCapabilitiesEvent event) {
    event.registerBlockEntity(Capabilities.ItemHandler.BLOCK, Registration.COMPLEX_BLOCK_ENTITY.get(), (o, direction) -> o.getItemHandler());
}
And here is the full block entity:
public class ComplexBlockEntity extends BlockEntity {

    public static final String ITEMS_TAG = "Inventory";

    public static int SLOT_COUNT = 1;
    public static int SLOT = 0;

    private final ItemStackHandler items = createItemHandler();
    private final Lazy<IItemHandler> itemHandler = Lazy.of(() -> items);

    public ComplexBlockEntity(BlockPos pos, BlockState state) {
        super(COMPLEX_BLOCK_ENTITY.get(), pos, state);
    }

    @Nonnull
    private ItemStackHandler createItemHandler() {
        return new ItemStackHandler(SLOT_COUNT) {
            @Override
            protected void onContentsChanged(int slot) {
                setChanged();
                level.sendBlockUpdated(worldPosition, getBlockState(), getBlockState(), Block.UPDATE_ALL);
            }
        };
    }

    public IItemHandler getItemHandler() {
        return itemHandler.get();
    }
}
Saving and Loading
Now some more code. This code is responsible for saving and loading the block entity. We seperate the saving and loading of the inventory itself to a separate method since we will need that for server to client synchronization as well.
NBT (represented by the CompoundTag class) is a way to store data to disk. It's a hierarchical
structure that can contain other tags. The CompoundTag class is basically a map of string keys to tags.
Tags can be of different types like StringTag, IntTag, ListTag, etc.
A common misconception is that blocks contain NBT in memory. This is not true. NBT is a serialization format that is used to store data to disk. In memory a block entity is just a class with fields. The only exception where NBT is used in memory is with itemstacks.
Everytime you make a change to the block entity you need to call setChanged to mark the block
entity as changed. If you don't do this your changes will not be saved to disk and you will lose
them when the world is saved and reloaded.
    @Override
    protected void saveAdditional(CompoundTag tag) {
        super.saveAdditional(tag);
        saveClientData(tag);
    }

    private void saveClientData(CompoundTag tag) {
        tag.put(ITEMS_TAG, items.serializeNBT());
    }

    @Override
    public void load(CompoundTag tag) {
        super.load(tag);
        loadClientData(tag);
    }

    private void loadClientData(CompoundTag tag) {
        if (tag.contains(ITEMS_TAG)) {
            items.deserializeNBT(tag.getCompound(ITEMS_TAG));
        }
    }
Server to Client synchronization
Because we want to synchronize the block entity from the server to the client (for rendering) we need to
override a few methods. The getUpdateTag and handleUpdateTag methods are used whenever a
new chunk is loaded. getUpdateTag is called server side and creates a tag that is sent to the client.
It's important to keep this tag as small as possible (network overhead) so we only send the data that
is really needed. That's why we made the saveClientData method.
The getUpdatePacket and onDataPacket methods are used whenever a block update happens. This is
used to notify the client that a block has changed. This is used for example when a blockstate changes
or when a block is explicitly marked as changed by the server. In our case we use this to notify the
client that the inventory has changed. We use the ClientboundBlockEntityDataPacket class to create
a packet that contains the data we want to send to the client. We use the saveClientData method
to save the data to the packet. On the client side we use the onDataPacket method to load the data
from the packet. We use the loadClientData method to load the data from the packet.
Note that ClientboundBlockEntityDataPacket.create(this) actually uses getUpdateTag to create the packet.
Be aware that even in single player we use networking to communicate information from server to client and vice versa.
    // The getUpdateTag()/handleUpdateTag() pair is called whenever the client receives a new chunk
    // it hasn't seen before. i.e. the chunk is loaded
    @Override
    public CompoundTag getUpdateTag() {
        CompoundTag tag = super.getUpdateTag();
        saveClientData(tag);
        return tag;
    }

    @Override
    public void handleUpdateTag(CompoundTag tag) {
        if (tag != null) {
            loadClientData(tag);
        }
    }

    // The getUpdatePacket()/onDataPacket() pair is used when a block update happens on the client
    // (a blockstate change or an explicit notificiation of a block update from the server). It's
    // easiest to implement them based on getUpdateTag()/handleUpdateTag()
    @Nullable
    @Override
    public ClientboundBlockEntityDataPacket getUpdatePacket() {
        return ClientboundBlockEntityDataPacket.create(this);
    }

    @Override
    public void onDataPacket(Connection net, ClientboundBlockEntityDataPacket pkt) {
        // This is called client side
        CompoundTag tag = pkt.getTag();
        // This will call loadClientData()
        if (tag != null) {
            handleUpdateTag(tag);
        }
    }
Block Entity Logic
Finally we actually need to give some logic to our block entity. In this case we want to increase the durability of the item in the inventory every second. If the durability reaches maximum we eject the item from the block entity.
We use level.getGameTime() to get the current game time. This is a counter that is increased
every tick. We use the modulo operator (%) to check if the current game time is a multiple
of 20 (20 ticks = 1 second). If it is we get the itemstack from the inventory and check if it
is damageable. If it is we decrease the damage value by 1. If the damage value reaches 0 we
eject the item from the block entity.
Note that tickServer is called from our block (ticker) class.
    public void tickServer() {
        if (level.getGameTime() % 20 == 0) {
            ItemStack stack = items.getStackInSlot(SLOT);
            if (!stack.isEmpty()) {
                if (stack.isDamageableItem()) {
                    // Increase durability of item
                    int value = stack.getDamageValue();
                    if (value > 0) {
                        stack.setDamageValue(value - 1);
                    } else {
                        ejectItem();
                    }
                } else {
                    ejectItem();
                }
            }
        }
    }

    private void ejectItem() {
        BlockPos pos = worldPosition.relative(Direction.UP);
        Block.popResource(level, pos, items.extractItem(SLOT, 1, false));
    }
Rendering
Besides the visuals of the block itself (which we will cover later in the datagen chapter) we also want an additional visual for the block entity. In this case we want to render the item in the inventory on top of the block.
When implementing a visual of a block there are basically two major types of rendering:
- A static model. This is the default and preferred way to render a block. You create a json model (using datagen or otherwise). It's also possible to do more complex and dynamic static models using baked models
- Dynamic rendering. This is used when you want to render something that is not possible with a static model. Usually this is when you want to do animation or other effects
In general you should always try to use a static model if possible. It's much more efficient and
easier to implement. In this example we need to use a dynamic BlockEntityRenderer because we
want to animate the rendering of the item in the inventory.
The LIGHT resource location represents the location of the texture we want to use as a special
glow effect. Note that because this texture is located in the textures/block folder we don't
need to stitch it to the atlas because this is done automatically for all textures in this folder.
More on stitching textures in a future tutorial.
The ComplexBlockRenderer class implements the BlockEntityRenderer interface. This interface
has one method render that is called every frame. In this method we fetch the IItemHandler
capability from the world for the block entity. This is done as an example of how to fetch
capabilities from a block entity. In this particular case we could also have added an api to
our block entity to access the item handler directly.
You are not supposed to use OpenGL directly in your rendering code. Instead you should use the
MultiBufferSource to get a BufferBuilder that you can use to render your model. The
PoseStack is used to transform the model. In this case we scale the model down to 50% and
move it to the center of the block. When render is called the PoseStack is already
translated to the correct position of the block entity. We use the current time to calculate
the angle of rotation of the item. mulPose is used to rotate the model around the y-axis.
Finally we render the model using the ItemRenderer and the BufferBuilder we got from the
MultiBufferSource.
It is important to ALWAYS push and pop the PoseStack when you modify it. Otherwise you will
possibly corrupt the PoseStack of the caller of your render method and this can cause
weird rendering issues. The PoseStack is a stack of matrices. When you push a matrix you
create a copy of the current matrix and push it on the stack. When you pop a matrix you
restore the matrix from the top of the stack.
In addition to the rendering of the item we also want to render a special glow effect. This effect is rendered by rendering a billboard (a quad that always faces the player) with a special texture. The texture is a series of 16x16 textures with a white circle in the middle and a transparent background. This texture has an associated mcmeta file that tells Minecraft to animate the texture by selecting a different texture every few frames.
The renderBillboardQuadBright method is responsible for rendering a quad that always faces
the player. It does this by manipulating the PoseStack so that it faces the player. It then
renders a quad with the given texture.
This method uses the translucent render type. This is a special render type that is used for translucent textures. It is important to use this render type for translucent textures because otherwise the textures will not render correctly.
public class ComplexBlockRenderer implements BlockEntityRenderer<ComplexBlockEntity> {

    public static final ResourceLocation LIGHT = new ResourceLocation(Tutorial2Block.MODID, "block/light");

    public ComplexBlockRenderer(BlockEntityRendererProvider.Context context) {
    }

    @Override
    public void render(ComplexBlockEntity be, float partialTicks, PoseStack poseStack, MultiBufferSource bufferSource, int combinedLight, int combinedOverlay) {
        IItemHandler h = be.getLevel().getCapability(Capabilities.ItemHandler.BLOCK, be.getBlockPos(), null);
        if (h != null) {
            ItemStack stack = h.getStackInSlot(ComplexBlockEntity.SLOT);
            if (!stack.isEmpty()) {
                ItemRenderer itemRenderer = Minecraft.getInstance().getItemRenderer();
                long millis = System.currentTimeMillis();

                poseStack.pushPose();
                poseStack.pushPose();
                poseStack.scale(.5f, .5f, .5f);
                poseStack.translate(1f, 2.8f, 1f);
                float angle = ((millis / 45) % 360);
                poseStack.mulPose(Axis.YP.rotationDegrees(angle));
                itemRenderer.renderStatic(stack, ItemDisplayContext.FIXED, LightTexture.FULL_BRIGHT, combinedOverlay, poseStack, bufferSource, Minecraft.getInstance().level, 0);
                poseStack.popPose();

                poseStack.translate(0, 0.5f, 0);
                renderBillboardQuadBright(poseStack, bufferSource.getBuffer(RenderType.translucent()), 0.5f, LIGHT);
                poseStack.popPose();
            }
        }
    }

    private static void renderBillboardQuadBright(PoseStack matrixStack, VertexConsumer builder, float scale, ResourceLocation texture) {
        int b1 = LightTexture.FULL_BRIGHT >> 16 & 65535;
        int b2 = LightTexture.FULL_BRIGHT & 65535;
        TextureAtlasSprite sprite = Minecraft.getInstance().getTextureAtlas(InventoryMenu.BLOCK_ATLAS).apply(texture);
        matrixStack.pushPose();
        matrixStack.translate(0.5, 0.95, 0.5);
        Quaternionf rotation = Minecraft.getInstance().gameRenderer.getMainCamera().rotation();
        matrixStack.mulPose(rotation);
        Matrix4f matrix = matrixStack.last().pose();
        builder.vertex(matrix, -scale, -scale, 0.0f).color(255, 255, 255, 255).uv(sprite.getU0(), sprite.getV0()).uv2(b1, b2).normal(1, 0, 0).endVertex();
        builder.vertex(matrix, -scale, scale, 0.0f).color(255, 255, 255, 255).uv(sprite.getU0(), sprite.getV1()).uv2(b1, b2).normal(1, 0, 0).endVertex();
        builder.vertex(matrix, scale, scale, 0.0f).color(255, 255, 255, 255).uv(sprite.getU1(), sprite.getV1()).uv2(b1, b2).normal(1, 0, 0).endVertex();
        builder.vertex(matrix, scale, -scale, 0.0f).color(255, 255, 255, 255).uv(sprite.getU1(), sprite.getV0()).uv2(b1, b2).normal(1, 0, 0).endVertex();
        matrixStack.popPose();
    }
}
We also need to register the renderer. To do this we make a new ClientSetup class.
This class is annotated with @Mod.EventBusSubscriber to tell NeoForge that it should
register this class to the event bus. The bus parameter tells NeoForge which event bus
to use (the mod bus in this case). The value parameter tells NeoForge that this class should only be registered
on the client side. This is important because the EntityRenderersEvent.RegisterRenderers is
only fired on the client side.
By doing this registration we tell Minecraft that whenever a block entity of type
ComplexBlockEntity is rendered it should use the ComplexBlockRenderer to render it (in addition
to rendering the block itself).
@Mod.EventBusSubscriber(modid = MODID, bus = Mod.EventBusSubscriber.Bus.MOD, value = Dist.CLIENT)
public class ClientSetup {

    @SubscribeEvent
    public static void initClient(EntityRenderersEvent.RegisterRenderers event) {
        event.registerBlockEntityRenderer(Registration.COMPLEX_BLOCK_ENTITY.get(), ComplexBlockRenderer::new);
    }
}
Data generation
In Minecraft al lot of things are represented in json files. This includes block models,
blockstates, item models, recipes, loot tables, advancements, etc. It's possible to create these
files by hand but when you have a larger mod this quickly becomes tedious. Datagen is also based
on an event called GatherDataEvent. Here you see how it is used.
From the main mod class we add this to the mod event bus using addListener.
All generated jsons are put in a folder called generated/resources. This folder is automatically
added to the classpath when running the game in the development environment. This means that
Minecraft will be able to find the jsons and use them. When building the mod the jsons are
automatically copied to the resources folder in the jar file. You can still put hand
written jsons in the resources folder and they will be used instead of the generated ones
(or in addition to them).
To actually do the generation you have to run the runData gradle task.
Do not edit generated jsons! They will be overwritten the next time you do the runData task again.
public class DataGeneration {

    public static void generate(GatherDataEvent event) {
        DataGenerator generator = event.getGenerator();
        PackOutput packOutput = generator.getPackOutput();
        CompletableFuture<HolderLookup.Provider> lookupProvider = event.getLookupProvider();

        generator.addProvider(event.includeClient(), new TutBlockStates(packOutput, event.getExistingFileHelper()));
        generator.addProvider(event.includeClient(), new TutItemModels(packOutput, event.getExistingFileHelper()));
        generator.addProvider(event.includeClient(), new TutLanguageProvider(packOutput, "en_us"));

        TutBlockTags blockTags = new TutBlockTags(packOutput, lookupProvider, event.getExistingFileHelper());
        generator.addProvider(event.includeServer(), blockTags);
        generator.addProvider(event.includeServer(), new TutItemTags(packOutput, lookupProvider, blockTags, event.getExistingFileHelper()));
        generator.addProvider(event.includeServer(), new TutRecipes(packOutput));
        generator.addProvider(event.includeServer(), new LootTableProvider(packOutput, Collections.emptySet(),
                List.of(new LootTableProvider.SubProviderEntry(TutLootTables::new, LootContextParamSets.BLOCK))));
    }
}
Block states
The datagen block state provider is used to generate model and blockstate json files. The
TutBlockStates class is a subclass of BlockStateProvider. The constructor takes a PackOutput
and an ExistingFileHelper. The PackOutput is used to write the generated files to the correct
location. The ExistingFileHelper is used to check if a file already exists. This is useful
when you want your generated jsons to use existing (vanilla) files.
The registerStatesAndModels method is used to register the blockstates and models. In this
example we use the simpleBlock method to generate a model and blockstate for both our blocks.
public class TutBlockStates extends BlockStateProvider {

    public TutBlockStates(PackOutput output, ExistingFileHelper exFileHelper) {
        super(output, Tutorial2Block.MODID, exFileHelper);
    }

    @Override
    protected void registerStatesAndModels() {
        simpleBlock(Registration.SIMPLE_BLOCK.get());
        simpleBlock(Registration.COMPLEX_BLOCK.get());
    }
}
Item models
Items also need models. In this tutorial these models are going to be very simple as they only have to refer to the block models.
The modLoc function creates a ResourceLocation for this mod and the given path. This is how
we refer to the block models.
public class TutItemModels extends ItemModelProvider {

    public TutItemModels(PackOutput output, ExistingFileHelper existingFileHelper) {
        super(output, Tutorial2Block.MODID, existingFileHelper);
    }

    @Override
    protected void registerModels() {
        withExistingParent(Registration.SIMPLE_BLOCK.getId().getPath(), modLoc("block/simple_block"));
        withExistingParent(Registration.COMPLEX_BLOCK.getId().getPath(), modLoc("block/complex_block"));
    }
}
Language provider
In code you typically only use language strings. These strings are then translated to the correct language by the game. These translations are also handled in json files and here is how you can generate them:
public class TutLanguageProvider extends LanguageProvider {

    public TutLanguageProvider(PackOutput output, String locale) {
        super(output, Tutorial2Block.MODID, locale);
    }

    @Override
    protected void addTranslations() {
        add(Registration.SIMPLE_BLOCK.get(), "Simple Block");
        add(Registration.COMPLEX_BLOCK.get(), "Complex Block");
    }
}
Block tags
Minecraft uses tags to group blocks, items, biomes, and other things. These tags are also
stored in json files. The TutBlockTags class is a subclass of BlockTagsProvider. The
constructor takes a PackOutput, a HolderLookup.Provider, and an ExistingFileHelper.
In this tutorial we associate our two blocks with two vanilla tags:
minecraft:mineable/pickaxe- This tag is used to determine if a block can be mined with a pickaxe.minecraft:needs_iron_tool- This tag is used to specify that a block needs at least an iron tool to be mined.
public class TutBlockTags extends BlockTagsProvider {

    public TutBlockTags(PackOutput output, CompletableFuture<HolderLookup.Provider> lookupProvider, @Nullable ExistingFileHelper existingFileHelper) {
        super(output, lookupProvider, Tutorial2Block.MODID, existingFileHelper);
    }

    @Override
    protected void addTags(HolderLookup.Provider provider) {
        tag(BlockTags.MINEABLE_WITH_PICKAXE)
                .add(Registration.COMPLEX_BLOCK.get(), Registration.SIMPLE_BLOCK.get());
        tag(BlockTags.NEEDS_IRON_TOOL)
                .add(Registration.COMPLEX_BLOCK.get(), Registration.SIMPLE_BLOCK.get());
     }
}
Item tags
Item tags are also stored in json files. The TutItemTags class is a subclass of ItemTagsProvider.
The item tags provider needs an instance of the previously created block tags provider.
Since we don't currently associate any tags with our items this class is empty.
public class TutItemTags extends ItemTagsProvider {

    public TutItemTags(PackOutput packOutput, CompletableFuture<HolderLookup.Provider> lookupProvider, BlockTagsProvider blockTags, ExistingFileHelper helper) {
        super(packOutput, lookupProvider, blockTags.contentsGetter(), Tutorial2Block.MODID, helper);
    }

    @Override
    protected void addTags(HolderLookup.Provider provider) {
    }
}
Recipes
Recipes are also stored in json files. The TutRecipes class is a subclass of RecipeProvider.
The constructor takes a PackOutput.
Recipe datagen can be used for all types of recipes. In this tutorial we generate both a shapeless recipe for the simple block and a shaped recipe for the complex block.
For every recipe we need to specify a category. This is a custom string that is used to group
recipes in the recipe book. In this tutorial we use RecipeCategory.MISC for both recipes.
We also need to specify if the recipe is gated behind a specific advancement. In this tutorial
we use the InventoryChangeTrigger to check if the player has a diamond in their inventory.
Note that recipes can be based on items but also on tags. Tags are usually better because it makes the recipe more flexible. For example, if you use a tag for the recipe input you can use any item that is in that tag.
public class TutRecipes extends RecipeProvider {

    public TutRecipes(PackOutput packOutput) {
        super(packOutput);
    }

    @Override
    protected void buildRecipes(RecipeOutput consumer) {
        ShapelessRecipeBuilder.shapeless(RecipeCategory.MISC, Registration.SIMPLE_BLOCK.get())
                .requires(ItemTags.DIRT)
                .requires(Tags.Items.GEMS_DIAMOND)
                .unlockedBy("has_diamond", InventoryChangeTrigger.TriggerInstance.hasItems(
                        ItemPredicate.Builder.item().of(Tags.Items.GEMS_DIAMOND).build()))
                .save(consumer);

        ShapedRecipeBuilder.shaped(RecipeCategory.MISC, Registration.COMPLEX_BLOCK.get())
                .pattern("dsd")
                .pattern("dxd")
                .pattern("ddd")
                .define('d', ItemTags.DIRT)
                .define('x', Tags.Items.GEMS_DIAMOND)
                .define('s', Items.STICK)
                .group("tutorial")
                .unlockedBy("has_diamond", InventoryChangeTrigger.TriggerInstance.hasItems(
                        ItemPredicate.Builder.item().of(Tags.Items.GEMS_DIAMOND).build()))
                .save(consumer);

    }
}
Loot tables
Loot tables are used to specify what items a block or entity drops when it is broken or killed.
The TutLootTables class is a subclass of VanillaBlockLoot. The reason we extend this class
is that we then get access to a lot of helper methods that makes it easier to generate loot tables.
For the simple block we use the dropSelf method. This method will make the block drop itself
when it is broken. For the complex block we use the createStandardTable method. This method
will generate a loot table that drops the block itself and the items that are in the block entity.
This is similar to how the shulker box works.
public class TutLootTables extends VanillaBlockLoot {

    @Override
    protected void generate() {
        dropSelf(Registration.SIMPLE_BLOCK.get());
        createStandardTable(Registration.COMPLEX_BLOCK.get(), Registration.COMPLEX_BLOCK_ENTITY.get());
    }

    @Override
    protected Iterable<Block> getKnownBlocks() {
        return BuiltInRegistries.BLOCK.holders()
                .filter(e -> e.key().location().getNamespace().equals(Tutorial2Block.MODID))
                .map(Holder.Reference::value)
                .collect(Collectors.toList());
    }

    private void createStandardTable(Block block, BlockEntityType<?> type) {
        LootPool.Builder builder = LootPool.lootPool()
                .setRolls(ConstantValue.exactly(1))
                .add(LootItem.lootTableItem(block)
                        .apply(CopyNameFunction.copyName(CopyNameFunction.NameSource.BLOCK_ENTITY))
                        .apply(CopyNbtFunction.copyData(ContextNbtProvider.BLOCK_ENTITY)
                                .copy(ComplexBlockEntity.ITEMS_TAG, "BlockEntityTag." + ComplexBlockEntity.ITEMS_TAG, CopyNbtFunction.MergeStrategy.REPLACE))
                        .apply(SetContainerContents.setContents(type)
                                .withEntry(DynamicLoot.dynamicEntry(new ResourceLocation("minecraft", "contents"))))
                );
        add(block, LootTable.lootTable().withPool(builder));
    }
}